How to Setup KeepSolid SmartDNS on Windows 10/8/7/Vista/XP?
- Key requirements to change DNS settings on Windows 10/8/7/Vista/XP
- How to add DNS to Windows 10
- How to change DNS on Windows 8/8.1
- How to setup a DNS server on Windows 7
- How to change DNS on Windows Vista
- How to set DNS server in Windows XP
Note: To unblock streaming services with our KeepSolid SmartDNS app, you have to register your IP address. Check out how to manage your IP address in the KeepSolid SmartDNS App and your KeepSolid User Office here.
Key requirements to change DNS settings on Windows 10/8/7/Vista/XP
That’s easy. All you need to have in order to setup our KeepSolid SmartDNS on Windows is as follows:
- KeepSolid SmartDNS account. You can sign up to SmartDNS right now by following this link.
- KeepSolid SmartDNS addresses. They are as follows:
62.210.136.158
172.96.164.226
Note: We recommend you to block Google DNS servers (8.8.8.8 and 8.8.4.4) on your router, otherwise you may not be able to bypass geo-restrictions and access the desired content.
How to add DNS to Windows 10
1. First things first, you should click Start and then click Settings.

2. After that choose Network & Internet.

3. Select the type of your connection.
Note: Our team has chosen Ethernet but if your Windows 10 is connected to the internet via a wireless connection then you must select WiFi or Wireless.

4. Click Change adapter options.

5. Now you should right-click on your network and select Properties.
-2_2551.webp)
6. In the appeared window uncheck Internet Protocol Version 6 (TCP/IPv6) > select Internet Protocol Version 4 (TCP/IPv4) > click Properties.

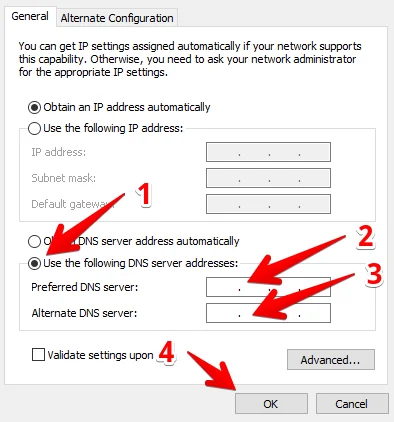
7. Then check Use the following DNS server addresses under the General Tab > enter SmartDNS IP addresses (62.210.136.158 or 172.96.164.226) > click OK.
8. Now restart your computer.
How to change DNS on Windows 8/8.1
1. First things first, you should open Windows Explorer > then click on Computer > Open Control Panel from the toolbar.
OR
Find the Control Panel via the search box.
2. Now you should click on Network and Internet to change VPN settings on Windows 8.
3. Then click on Network and Sharing Center.
4. Now select Change adapter settings on the left side of the screen.
5. Now you should click on Local Area Connection or Wireless Network Connection, depending on how you are connected to the Internet > click Properties.
6. To download DNS server for Windows 8 you should uncheck the Internet Protocol Version 6 (TCP/IPv6) > select the Internet Protocol Version 4 (TCP/IPv4) > click Properties.
7. Then check Use the following DNS server addresses under the General Tab > enter SmartDNS IP address (62.210.136.158 or 172.96.164.226) > click OK.
8. Restart your computer.
Now you know how to change DNS on Windows 8 and 8.1.
How to setup a DNS server on Windows 7
1. Firstly, you should click on the Start button and choose the Control Panel.
2. In the appeared window please select Network and Internet.
3. Now you should click on the Network and Sharing Center.
4. Click on Change adapter settings.
5. Now you should choose Local Area Connection or Wireless Network Connection, (depending on how you are connected to the Internet) and then click Properties to enable DNS on Windows 7.
6. Now you should uncheck the Internet Protocol Version 6 (TCP/IPv6) > check and select the Internet Protocol Version 4 (TCP/IPv4) > click Properties.
7. To install DNS in Windows 7, check Use the following DNS server addresses under the General Tab > enter SmartDNS IP address (62.210.136.158 or 172.96.164.226) > click OK.
8. Restart your computer.
That’s all! Now you know how to change DNS on Windows 7 and can easily access streaming services on Windows 7.
How to change DNS on Windows Vista
1. First things first, you should click on the Start button and then click the Control Panel.
2. Choose Network and Internet > then click Network and Sharing Center.
3. Now you should click on Manage network connections.
4. Now you should choose Local Area Connection or Wireless Network Connection.
Note: This item depends on the way how your computer is connected to the Internet.
5. Then click Properties to change Windows Vista DNS settings.
6. Now you should uncheck the Internet Protocol Version 6 (TCP/IPv6) > check and select the Internet Protocol Version 4 (TCP/IPv4) > click Properties.
7. Check Use the following DNS server addresses under the General Tab > enter SmartDNS IP address (62.210.136.158 or 172.96.164.226) > click OK.
8. Now you should restart your computer.
Now you know how to change DNS on Windows Vista and can easily access your favorite video content.
How to set DNS server in Windows XP
1. Firstly, you should click on the Start button, then choose Control Panel, and then click on Network Connection.
2. After that, you should select your active network connection.
3. Then click on Properties.
4. Select Internet Protocol (TCP/IP) and click Properties to change DNS server settings on Microsoft Windows XP.
5. In a new window check Use the following DNS server addresses > enter SmartDNS IP address (62.210.136.158 or 172.96.164.226) > click OK.
8. Restart your computer to finish the configuration of DNS server on Windows XP.


